Programming Asp net a Popup to Continue or Stay at the Same Page
ASP.NET AJAX Popup Control can be attached to any ASP.NET control to display additional contents in a popup window. The popup window can display either static contents just like tool tips or can be made more interactive with the help of AJAX UpdatePanel control. It can also have other ASP.NET controls inside which may or may not cause full or AJAX based asynchronous post backs using AJAX UpdatePanel. In this tutorial I will show you how you can use AJAX Popup Control Extender with server side ASP.NET controls.
To start this tutorial you need to create a blank ASP.NET page that have an instance of AJAX ScriptManager control on top. This control is required to use any AJAX related feature in ASP.NET page and to enable partial page rendering.
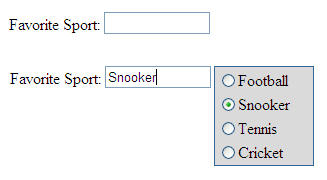
<asp:ScriptManager ID="ScriptManager1" runat="server"></asp:ScriptManager> Then you add a markup of simple message label and a TextBox as shown in the above figure:
Favorite Sport: <asp:TextBox ID="TextBox1" runat="server" Width="100" /> Then you need to create a popup window which you want to display with the help of AJAX Popup Control Extender. I am using ASP.NET Panel control in this tutorial to popup a RadioButtonList of different sports. You are free to popup any control you want in your application such as ASP.NET Calendar or Login controls.
<asp:Panel ID="Panel1" runat="server"> <asp:UpdatePanel ID="UpdatePanel1" runat="server"> <ContentTemplate> <asp:RadioButtonList ID="RadioButtonList1" runat="server" AutoPostBack="True" BorderColor="#336699" BorderStyle="Solid" Width="100" BorderWidth="1" BackColor="#dadada" OnSelectedIndexChanged="RadioButtonList1_SelectedIndexChanged"> <asp:ListItem>Football</asp:ListItem> <asp:ListItem>Snooker</asp:ListItem> <asp:ListItem>Tennis</asp:ListItem> <asp:ListItem>Cricket</asp:ListItem> </asp:RadioButtonList> </ContentTemplate> </asp:UpdatePanel> </asp:Panel> In the above markup, I first declared an ASP.NET Panel control. Inside Panel I am using AJAX UpdatePanel control so that any post back occur inside Panel not cause the whole page to be flicker or refresh. UpdatePanel control contains a RadioButtonList control with some ListItems to display different sports names. Notice that the RadioButtonList control's AutoPostBack property is set to true and an event handler is attached with the OnSelectedIndexChanged event of RadioButtonList. This is the requirement here in this tutorial because I want to update my TextBox with the selected sports name as soon as user selects any sports item from the RadioButtonList control.
Next, you need to add AJAX Popup Control Extender on the page with some basic properties set as shown in the following markup
<ajax:PopupControlExtender ID="PopupControlExtender1" runat="server" TargetControlID="TextBox1" PopupControlID="Panel1" Position="Right" CommitProperty="value" OffsetX="3"> </ajax:PopupControlExtender> The explanation of the above properties and some additional properties of AJAX Popup Control Extender is given below:
TargetControlID:The ID of the control you want to attach the popup control with. In the above example I am attaching popup control with TextBox control.
PopupControl:The ID of the control to display as popup window. In the above example I am using Panel control.
Position:This is optional property and can be set to Left, Right, Top, Bottom or Center. It specifies the relative position of the popup control with respect to target control.
CommitProperty:This property is also optional and specifies which property will return the result of the popup window. In the above example I put "value" as the value of this property. This is because every time use will select any item from the RadioButtonList control the value of the selected option will be returned from the popup.
CommitScript:This is another optional property and specifies the additional script to run after setting the result of the popup window.
OffsetX and OffsetY:These two properties specify the number of pixels to offset the popup window horizontally or vertically from its default position as specified by Position property.
The final bit of code you need to finish this tutorial is the SelectedIndexChanged event of RadioButtonList control that hide the popup control by calling its Commit method as soon as user select any item from the RadioButtonList. It also passes the selected value as the parameter of the Commit method so that the value can be returned to target control for display.
protected void RadioButtonList1_SelectedIndexChanged(object sender, EventArgs e) { PopupControlExtender1.Commit(RadioButtonList1.SelectedValue); } Source: https://www.ezzylearning.net/tutorial/using-asp-net-ajax-popup-control-extender
0 Response to "Programming Asp net a Popup to Continue or Stay at the Same Page"
Post a Comment